Attribute Dependencies
About Attribute Dependencies
If two Drop-Down List or Multi-Select List attributes are logically related, you can create an attribute dependency to link them.
In an attribute dependency, the value selected for the first attribute (the controlling attribute) determines which values can be selected in the second attribute (the dependent attribute). The controlling attribute's value acts as a filter for the dependent attribute: after you select a value for the controlling attribute, the dependent attribute only displays list options that are valid for the controlling attribute's value (and hides those that are not valid).
Attribute dependencies help to protect the integrity of your data by ensuring that users select valid value combinations. They are also useful for attributes that have a very large number of values: dependencies make it much easier for users to select a value, because they limit the number of options that are displayed.
Example
A common use case for attribute dependencies is for attributes with hierarchical relationships, such as geographic categories like State and City. Since City is a subcategory of State, only value combinations where the selected city is in the selected state are valid: for example, if State is set to California, setting City to Miami would not be valid.
If you set up an attribute dependency in which State is the controlling attribute and City is the dependent attribute, users would not be able to select Miami when the State attribute is already set to California. Instead, the City attribute would only display options for cities that are actually located in the selected state (i.e. Los Angeles, San Francisco, etc.).
Attribute dependencies are also useful for complex activity types that have a large number of attributes, but where not all attributes are relevant in every situation. Attribute dependencies are designed with several features to streamline the user experience when working with these types of activities:
-
Fields appear only when relevant: Dependent attributes stay hidden until triggered by a specific selection. This minimizes cognitive load for users, and speeds up the process of creating an activity.
-
Reduced manual selections: When a dependent attribute has only one valid option, the form auto-selects it, eliminating unnecessary manual inputs.
-
No irrelevant “N/A” selections: Dependent attributes can be conditionally required, so they're mandatory only when relevant. This means users don't have to spend time selecting “N/A” for irrelevant fields, while ensuring that critical data is collected when it matters.
How It Works
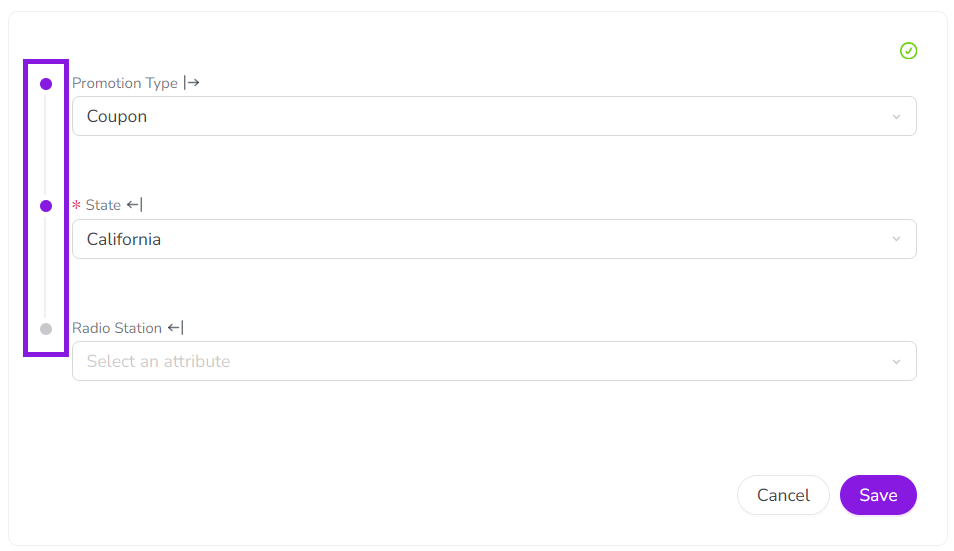
Grouped Dependent Attribute Controls
When attributes are part of a dependency, the user experience of selecting values for these attributes is different than for standard attributes:
-
When you create or edit an activity of a type that has one or more attribute dependencies, all of the fields for attributes that are part of a dependency are grouped into their own separate section in the list of attributes:
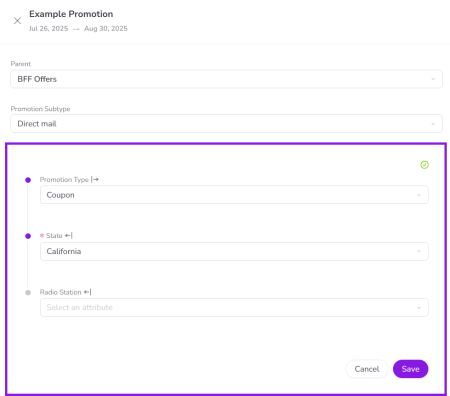
-
Within the attribute dependencies section, the links between attribute dependencies (and chains of dependencies) are visually represented:

Note
The display order of attributes in an activity is defined centrally in
 Activity Configuration > Attributes > Attribute Definitions. This display order applies globally across all activity types.
On activity types with attribute dependencies, the attribute dependencies section is inserted into the display order at the position of the first controlling attribute, based on the global order. Because this section also includes all other attributes that are part of dependencies, these attributes may appear higher (or lower) in the display order than they would if they weren’t part of a dependency.
-
When you select a value for any attribute in the dependencies section, it is not automatically saved. Instead, you must click Save to manually save the selected values. This helps to ensure that any required attributes in the dependency have a value set.

Note
The attribute dependencies section appears in two places: the Details Panel (when you edit an existing activity) and the Details step of the Activity Setup Assistant (when you create a new activity).
The section works the same way in both places, with one exception: the Save button and the missing value indicator icon are not used in the Activity Setup Assistant version. Instead, the Next button of the Activity Setup Assistant works the same way as the Save button in this context.
Auto-Hide Attributes & Auto-Select Lone Attribute Options
The attribute dependencies section has two features designed to streamline the process of selecting attribute values:
Auto-Hide
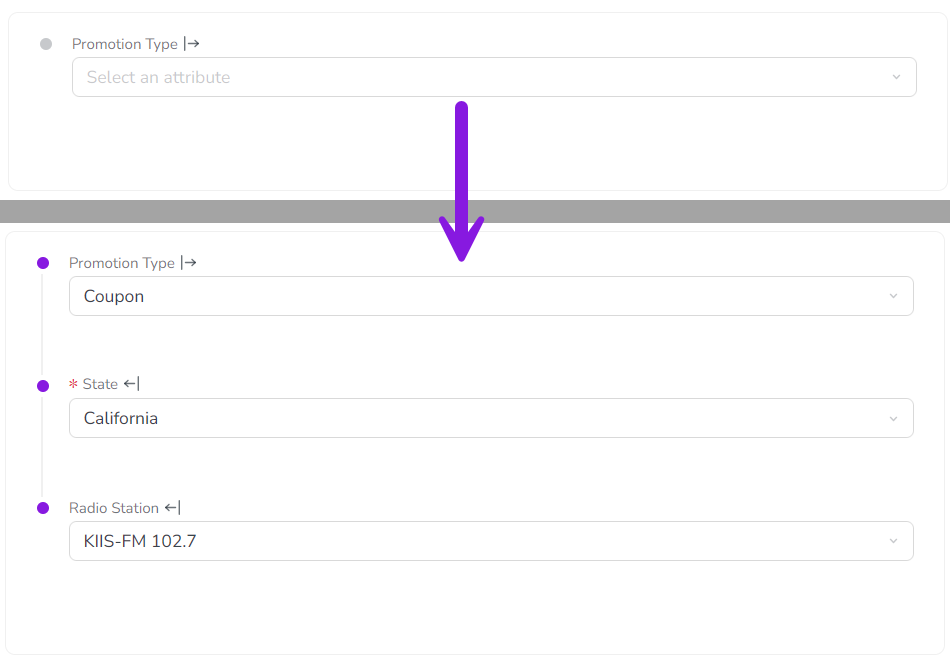
When a dependent attribute is not (yet) relevant to the activity being created, it is automatically hidden. This minimizes the number of attributes that are initially visible when creating an activity, and reduces distracting visual clutter.
A dependent attribute only becomes visible after you set the controlling attribute to a value for which the dependent attribute has valid options:
-
If there are no valid options in a dependent attribute, it remains hidden.
-
For dependency chains (multiple linked dependencies), additional dependent attributes are progressively revealed (as needed) after each controlling attribute selection.
Example
In this example, only one attribute (Promotion Type) is visible initially. Making a selection for Promotion Type reveals the State attribute, and selecting a state further reveals the Radio Station attribute:
Auto-Select
In some cases, a controlling attribute value has only a one valid option in the dependent attribute. This can happen if an attribute previously had more options that are no longer needed and have been removed, or if you want users to set a value for data consistency.
Whenever you select a value in a controlling attribute that leaves only one possible option in the dependent attribute, the system automatically selects that option in the dependent attribute to save you time and unnecessary clicks.
Required Dependent Attributes
Dependencies are active on any activity type where both the controlling attribute and the dependent attribute are present. If the dependent attribute is set as required for that activity type, then it will also be required within the attribute dependency on that activity type.
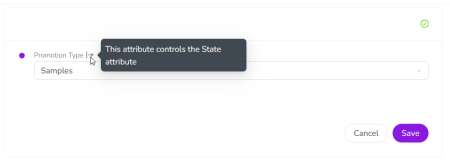
When a dependent attribute is set as required, it is only conditionally required. This means that it is only required when its controlling attribute is set to an option that makes it relevant. If the controlling attribute is set to an option that does not have valid options in the dependent attribute, then the dependent attribute is not required in this situation (and is not displayed, due to Auto-Hide). This ensures that you don't have to select a value for an attribute when it isn't relevant, but don't miss an attribute when it is needed.
Example
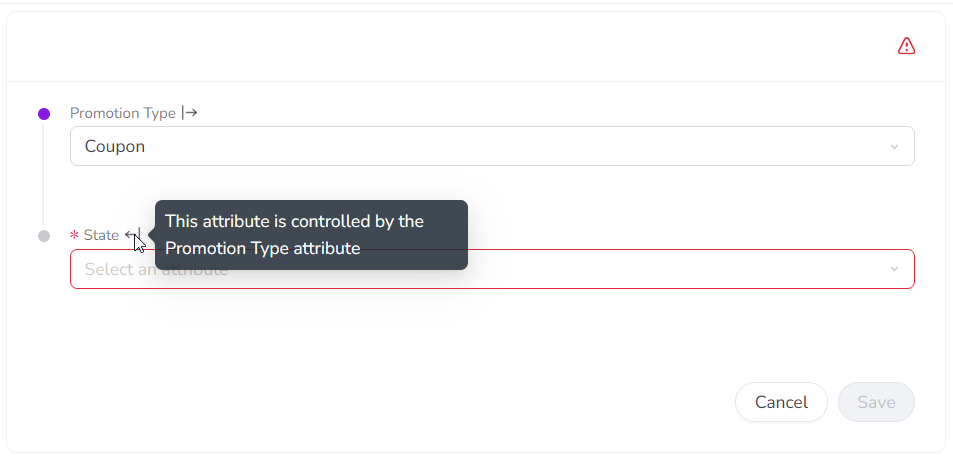
In this example, the State attribute is a dependent of the Promotion Type attribute:
-
If the Promotion Type is set to Samples, the State attribute is not relevant, so it's not required in this case (and not displayed):
-
If the Promotion Type is set to Coupon, the State attribute becomes relevant, so it is now conditionally required (and marked as required accordingly):


Create an Attribute Dependency
You can create an attribute dependency between two attributes that meet the following requirements:
-
Only List-Type attributes: Both attributes must have the attribute type Drop-Down List or Multi-Select List.
-
Attributes must exist on the same activity type: You can only set an attribute as the dependent attribute if it is used on at least one activity type where the controlling attribute is also used. It's not possible to create a dependency across activity levels, i.e. you can't set an attribute on a parent activity control a dependent attribute on a child activity (or vice-versa).
Note
Dependencies between attributes take effect on all activity types where both of the attributes involved in the dependency are present. If you need to make a dependency exclusive to a specific activity type, you can create new attributes that are used only on that activity type, then create a dependency between them.
Tip: Multi-Level Dependencies
You can create multi-level dependencies by "chaining" multiple dependencies together, e.g. you can chain a Country-State dependency with a State-City dependency to create a three-level Country-State-City dependency.
In multi-level dependencies, the available options for an attribute at each level are determined by the selected option for the attribute at the next level above it, starting with the top-level controlling attribute in the chain. For example, the selected option for Country determines the options available for State, which in turn determines the options available for City.
To chain dependencies, set the shared or "middle" attribute (e.g. State) between two dependencies as both the dependent attribute of the top-level attribute, and the controlling attribute of the bottom-level attribute. In the Country-State-City example, State would be the dependent attribute of Country, and the controlling attribute of City.
To set up a new attribute dependency, follow these steps:
-
In the Uptempo navigation menu, click
 Activities.
 -
In the Activities section, click
 Settings.
The Activity Configuration page opens.
-
On the Activity Configuration page, click Attributes > Attribute Dependencies.
The Attribute Dependencies table is displayed.
-
Click Create Dependency.
The Create Dependency dialog opens.
-
Use the Controlling Attribute list to select the attribute whose value controls the available selections in the second (dependent) attribute.
-
You can type into the Controlling Attribute list field to search for attributes by keyword.

The selected attribute's list options are shown in the Controlling Options table, and the Dependent Attribute list activates.
-
-
Use the Dependent Attribute list to select the attribute whose available selections are controlled by the first (controlling) attribute.
-
You can type into the Dependent Attribute list field to search for attributes by keyword.
The selected attribute's list options are shown in the Dependent Options table.
Note:
To appear in the Dependent Attribute list, an attribute must be both (a) a Drop-Down List or Multi-Select List and (b) used alongside the selected controlling attribute on at least one activity type.
If there are no attributes that meet both requirements, the Dependent Attribute list remains deactivated, and the selected controlling attribute can't be used to create a dependency.
-
-
In the Controlling Options table, click a list option to select it.
The selected controlling list option is highlighted.
-
In the Dependent Options table, click on a list option to select it and set it as valid for the selected controlling list option.
-
The dependent list options you select here determine which list options are shown to users in the dependent attribute field when the specified controlling list option is selected.
-
You can select one, multiple, all, or no dependent list options for any controlling list option.
-
It is not mandatory to select dependent list options for every controlling list option. If no dependent list options are selected for a controlling list option, users who choose that controlling list option will not be able to set any value for the dependent attribute.
-
For long option lists, use the Search Dependent Options box to search for dependent list options by keyword. To only view dependent list options you have already selected, turn on the Show only selected options setting.
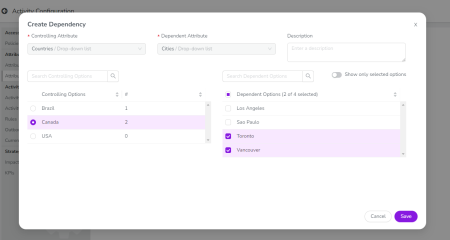
The selected dependent list options are highlighted.
-
-
Repeat steps 7 and 8 for each controlling list option for which you want to select dependent list options. In the Controlling Options table, the # column displays the number of currently selected dependent list options for each controlling list option.
-
Optional: Enter a brief description of the attribute dependency into the Description field. This description text is shown in the Attribute Dependencies table (Settings > Attributes > Attribute Dependencies).
-
Click Save, then click Save Changes to finish creating the new attribute dependency.
Important
When you create a new attribute dependency, this may affect the values currently set in the dependent attribute on existing activities. If an activity has an existing value in the dependent attribute that is not valid under the new dependency, the will be removed (set as empty/blank).
The Create Dependency dialog closes. Your new attribute dependency is displayed in the Attribute Dependencies table, which also shows the number of activity types that use the new attribute dependency under the # Activity Types column.


You have successfully created an attribute dependency.
Edit an Attribute Dependency
After an attribute dependency has been created, you can edit it at any time to modify the dependent list options that are selected for each controlling list option.
Note
When an attribute dependency is created, the selected controlling and dependent attributes are fixed, and can't be changed later. If you need to change either of these attributes for an existing attribute dependency, create a new attribute dependency instead.
To edit an existing attribute dependency's dependent list options, follow these steps:
-
In the Uptempo navigation menu, click
Activities. -
In the Activities section, click
Settings.The Activity Configuration page opens.
-
On the Activity Configuration page, click Attributes > Attribute Dependencies.
The Attribute Dependencies table is displayed.
-
In the table, find the attribute dependency you want to edit and click
 Edit.
Edit.The Dependency Editor dialog opens.
-
Make changes to the dependent list options as need ed.
-
Optional: If needed you can also change the text in the Description field.
-
For detailed instructions, see Create an Attribute Dependency.
-
-
Click Save, then click Save Changes to finish editing the attribute dependency.
The Dependency Editor dialog closes, and you are returned to the Attribute Dependencies table.
You have successfully modified the dependent list options for an existing attribute dependency.
Delete an Attribute Dependency
If an attribute dependency is no longer needed, you can delete it at any time. When you delete an attribute dependency, this does not affect the actual values set in the controlling and dependent attributes on activities, and these values will remain unchanged.
Warning
Deleting an attribute dependency is permanent. You can't undo this action.
To delete an existing attribute dependency, follow these steps:
-
In the Uptempo navigation menu, click
Activities. -
In the Activities section, click
Settings.The Activity Configuration page opens.
-
On the Activity Configuration page, click Attributes > Attribute Dependencies.
The Attribute Dependencies table is displayed.
-
In the table, find the attribute dependency you want to edit and click
 Delete.
A confirmation dialog is shown.
-
Click Delete in the confirmation dialog.
The attribute dependency is removed from the Attribute Dependencies table, and a success message is displayed to confirm that the dependency was deleted.
You have successfully deleted an attribute dependency.