The Upload Process
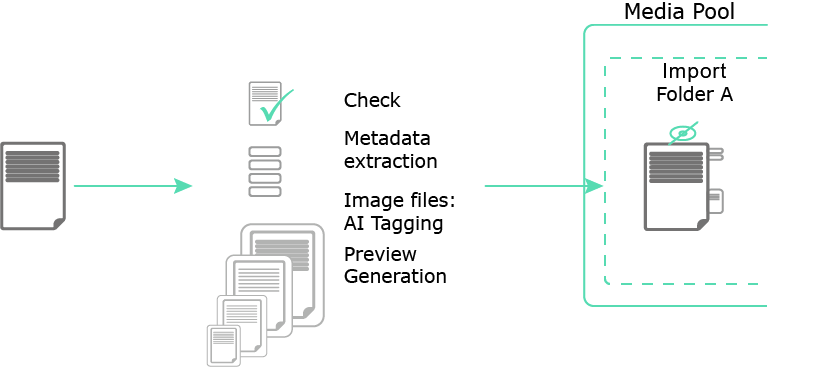
When uploading, one or more files are loaded into the Import folder. The metadata of the files is extracted and copied to the asset attributes. Preview images (thumbnails) are also generated.
The file format for the file that you want to import must be created. Other formats cannot be added to the upload. Which file formats are permitted is customized and adapted to the formats used in your company.
During the upload, the following will be checked:
-
Duplicates: During the upload, the file content is checked for duplicates using a bit-by-bit check and unique cryptographic MD5 checksum verification. This ensures that even identical files with different names are reliably detected as duplicates. A message is displayed if a file has already been created as an asset. When you upload several files, any duplicates found are skipped and the upload process is continued.
-
Linked images: When you upload an InDesign file with linked images, the module checks whether the images are available. It also checks whether any duplicates of the linked images already exist in the module.
-
Valid fonts: If the Font check function is activated and configured, the module checks whether the fonts included in an InDesign file upload are valid.
Errors that occur during the upload can be displayed via the menu command in the log area of the respective import folder. See Import Area.
-
File metadata is extracted and will be set as asset attributes. This applies, for example, to the file type, dimensions, or resolution of the file. The file name is transferred as the title for the asset.
To display an asset in the module Media Pool, thumbnails in different sizes are generated. The thumbnails represent the asset in search results or in the asset detailed view, for example.
Note
Thumbnails are used to give users a visual preview of an image or asset before they click or zoom in on the actual image. Thumbnails are created automatically to ensure that they can be displayed in different sizes and qualities on different devices and platforms.
The automatic conversion will resize the image to a specific size, converts it to the RGB color space (the color space used by most displays), and reduces the resolution of the image to reduce file size and load time. It is important to note that preview images are not exact copies of the original images, but compressed and customized versions.
Note
Metadata is extracted and thumbnails are automatically generated only for the supported Media Pool file types. If you have any questions, please contact your system administrator.
Several files are uploaded one after the other. You can use the button to stop and to continue the import.
It is possible that AI tagging for image files is available on your system. This is a paid service. If enabled, images are analyzed and any elements which are found are stored as tags in the attributes of the asset. Even Adobe PSD files can also be automatically tagged by analyzing their large preview. The tags that were automatically generated by AI can be viewed and individually deleted when editing the properties under AI Tagging. Users can thus eliminate those tags that are not a good match for the asset. It is possible to change the language of the tags. The default is the system language set for the user.
You can see Edit Properties the generated AI tags in the asset properties. Some fine tuning is usually required. Adjust the tags by deleting unwanted or incorrect tags by clicking the close button in a tag.

The automatic tags can be included in the search, see Widgets. If you have any questions, please contact Uptempo.
You can open the Import dialog in two convenient ways:
-
Click > Assets > and then click the button. Once the dialog opens, you can either use the button or simply drag and drop your files to upload them.
-
Drag files directly from your computer into the Import overview page or into the Search window of the Media Pool module.
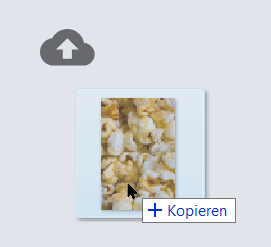
Time-saving tip: Add images directly from your clipboard without searching for the file. Simply copy an image with Ctrl + C (Windows) or Cmd + C (Mac), then activate the import window and paste using Ctrl + V or Cmd + V. Click Start to complete the upload.
The dialog box displays your added files.
Click to begin the upload, which runs in the background. You can continue working by clicking or without waiting for the upload to finish.
With each upload you can upload files with a size of up to 10 GB to the module Media Pool.
Note
Please note that there must be sufficient storage space on your server to process the file. The storage space required for the file may exceed the available storage space.
The memory required for a file is calculated based on the following formula:
Width (px) x height (px) x color depth (bit)/ 8 x color channels= RAM in bytes
Example:
-
Image with 640 px × 480 px, 16 bit color depth, CMYK:
640 × 480 × 16/8 × 4 = 2457000 bytes = 2.3 MB -
Image with 25000 px × 25000 px, 16 bit color depth, CMYK:
25000 × 25000 × 16/8 × 4 = 5000000000 bytes = 4.7 GB
To make it as efficient as possible to create assets, we recommend using the following rules as a basis when including files in uploads:
Assets with identical mandatory properties:
-
Editing the asset properties manually may be very time-consuming. If you want to edit the attributes of several assets at the same time, combine them in one upload. To do so, the following mandatory attributes must be identical:
-
Asset type
-
Virtual DB, which means the set of users for which the asset is visible.
-
at least one category
-
Mandatory attributes of the asset type
-
-
These attributes must be edited to access the asset in the module. The other attributes may differ and can then be edited separately for each asset. For more information, see Completing the Attributes of Several Assets at Once.
-
Versions of existing assets: You can version assets. If you want to version multiple assets at the same time, use the mass versioning function. For more information, see Versions.
The length of time required for the import depends on the file size, your broadband and the processing time required (for extracting meta data, for example). Importing very large files (for example, 500 MB or more) can therefore require a very large number of system resources under certain circumstances and may lead to errors or terminations. In the case of large image files in particular (for example, non-compressed TIFF files), we recommend checking whether the file size can be reduced or whether it is actually necessary to store the source file in the module Media Pool.
Once you start the import, the upload progress for each file is displayed. A status bar for the overall import is displayed below the list.
-
Choose the right asset type to ensure all relevant information is entered.
-
You can use suggestions, but you may need to adjust the pre-filled fields.
-
If you're unsure, ask. If you don't know which asset type to use, contact your administrator or experienced colleagues.
-
Be thorough. Fill in as many fields as you can. This makes the asset easier to find and use.