Image Editor
In a rendering scheme, you can specify whether an image can be edited before downloading or sending. Editing of an image is activated by default for the Presentation, Web, and Print rendering schemes.
You can open the Image Editor when you save or email one or more assets. You can open the Editor in the Asset download or Send as e-mail dialog invoke the Edit function in the gear menu below the asset, if the selected rendering scheme allows the asset format to be edited.
Note that the editing assets is covered by the instructions for ⋮ >> (see Save) or Send as e-mail (see E-Mail Delivery.
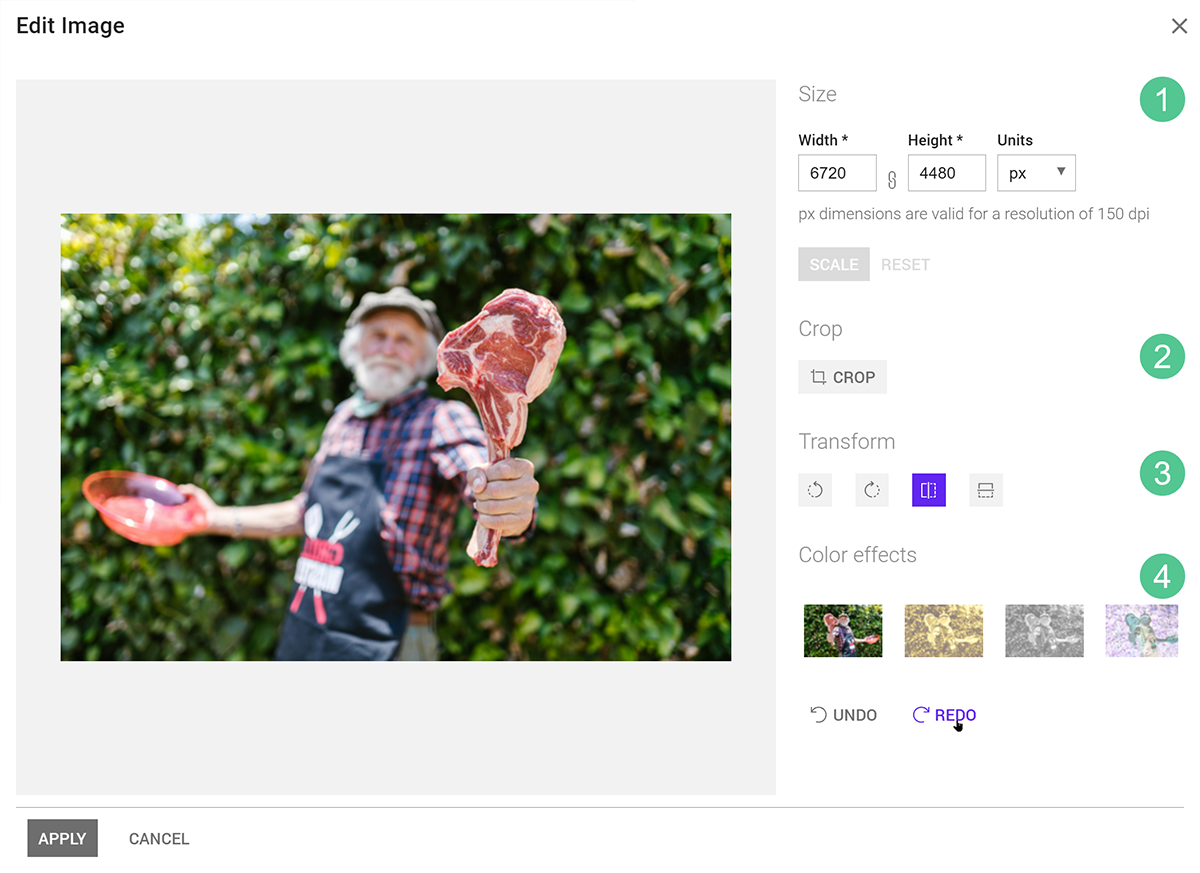
You can access the following functions to edit an image:
This function defines the size ❶of the image. The dimensions relate to the resolution specified in the rendering scheme for the file format. You can enter the new height or the new width. The other value will be calculated automatically to maintain aspect ratio. The image cannot be stretched. If you increase the dimensions, the resolution will be reduced. A warning will be displayed in such cases. Click to make the change.
You want to download a JPG file. It will have a resolution of 300 DPI if you download it with the standard rendering scheme Print. The following will be displayed when using the image editing function Size:
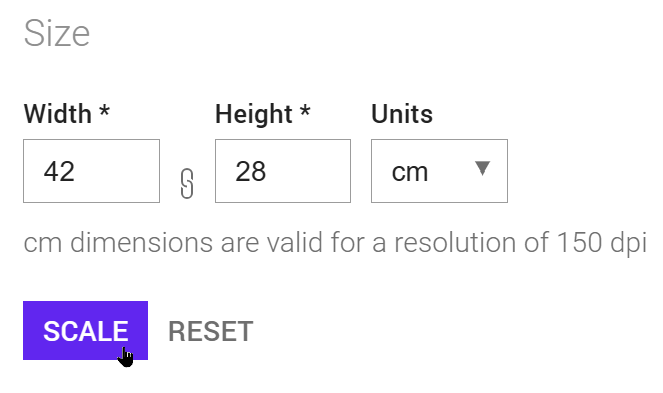
This means that the image will have a size of 42 × 28 cm at a resolution of 300 DPI if you download it without editing.
You need the image for an A4 brochure, and the image should be only 16 cm wide. If you download the image without editing, you would have to resize it manually. The file size will also be unnecessarily large.
To avoid this, enter the value 16 (cm) into the Width field in the Size section. The height will be calculated automatically. Then click Scale. If you close the Image Editor dialog with Confirm and download the image, it will be displayed with a width of 16 cm and a resolution of 300 DPI.
You want to use the image from example 1 in a HTML advertising banner. You therefore select the standard rendering scheme Web which outputs JPG files with a resolution of 72 dpi. The following will be displayed when using the image editing function Size:
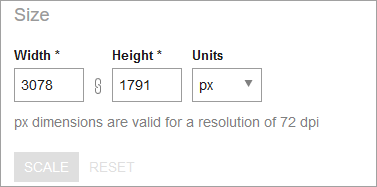
This means that the image will be displayed with dimensions of 6720 × 4480 pixels at a resolution of 72 dpi.
You need the image to be 1000 pixels wide in your banner. If you download the image without editing, you would have to resize it manually. The file size would also be unnecessarily large.
To avoid this, enter the value 1000 (pixels) into the Width field in the Size section. The height will be calculated automatically. Then click . If you close the Image Editor dialog with Apply and download the image, it will be displayed with a width of 1000 pixels at a resolution of 72 DPI.
Note
If you want to scale the image and select a specific section, you can jump directly to the function using the option Select size of the image to be cropped. See the following section for more information.
You can use the Crop ❷functions to crop the image to a specific section (minimum size 50 × 50 pixels). Click to open the following dialog:
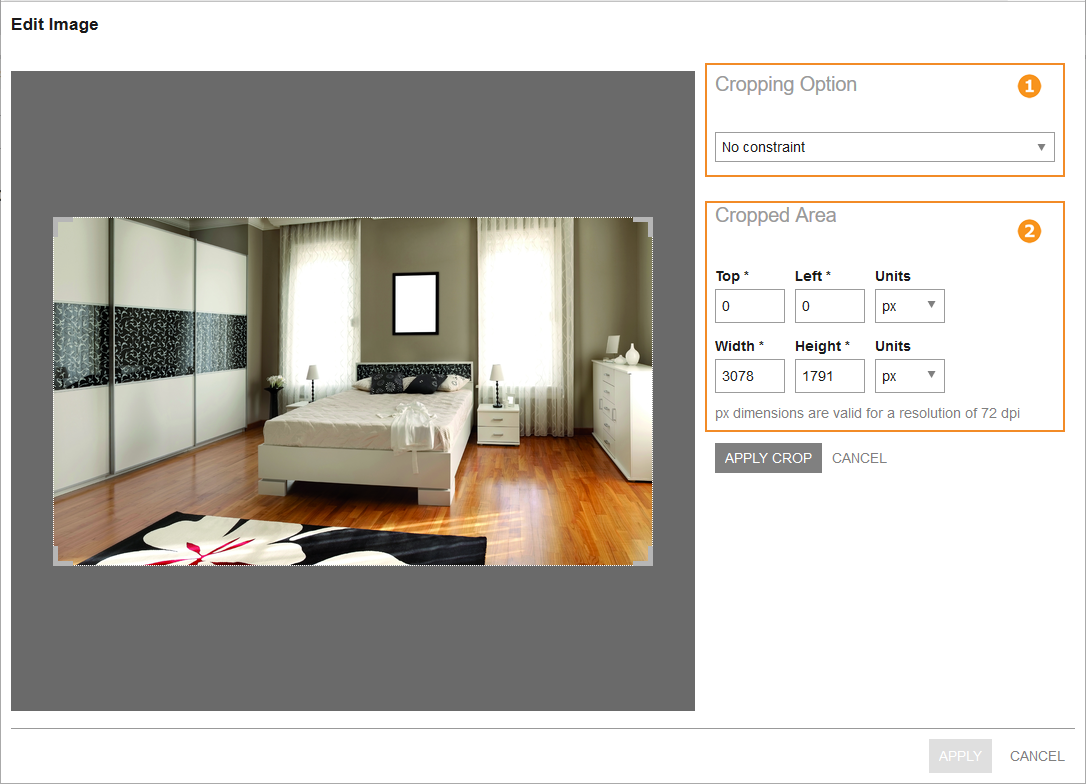
A preview of the image is shown on the left along with a crop rectangle. You can click the corners of the rectangle and drag them to the desired size. If you click within the rectangle and hold the mouse button down, you can position the rectangle on the image to specify the section which you want to keep.
The size and position of the rectangle is also displayed on the right beneath ❷Cropped Area. The rectangle can also be edited in these fields:
-
Position: The Top and Left fields correspond to the distance between the top left corner of the rectangle and the original top left corner of the image.
-
Size: TheWidth and Height fields correspond to the size of the rectangle. The values relate to the dimensions of the original image section in the resolution specified by the rendering scheme.
You can use the cropping options to the top right ❶to control the crop rectangle regardless of whether you change the rectangle with the mouse or using the fields under Cropped Area. The following cropping options are available:
-
No constraint: There are no restrictions on how you can change the crop rectangle within the image. The final size of the image will be the same as the size of the cut-out section in the original image.
-
Original aspect ratio: The rectangle will have the same aspect ratio as the original image. The aspect ratio will not be changed if you change the size of the rectangle. The final size of the cut-out section will be the same as the size of the section in the original image.
-
Custom aspect ratio: If you select this option, two fields will be displayed in the ❶section, in which you can enter a horizontal to vertical aspect ratio. The crop rectangle will automatically be set to its maximum size with this aspect ratio. The aspect ratio will not be changed if you change the size of the rectangle. The final size of the cut-out section will be the same as the size of the section in the original image.
-
Define dimensions of cropped image: If you select this option, two fields will be displayed in the section ❶in which you can enter the desired size of the cut-out section. The crop rectangle will automatically be set to its maximum size with the aspect ratio derived from the width and height which you have entered. You can then change the position and size of the rectangle to select the section which you want to cut out. Click Crop to display the selected section. Once the image has been downloaded, it will have the specified size at the resolution of the rendering scheme.
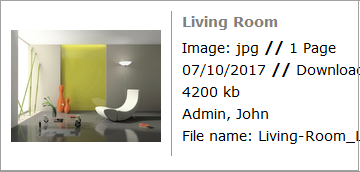
You want to use the following asset but only need a section with a table and chair.
In this example, you determine the size of the section to be cropped under Cropping Option > Define dimensions of cropped image.
You need the image for a printed product, i.e. at a resolution of 300 DPI with a width of 16 cm and a height of 8 cm.
Select ⋮ > > at the search result. Select a rendering scheme which outputs the file format at a resolution of 300 dpi, e.g. the standard rendering scheme Print. Then click the gear menu on the preview image and select Edit. This will open the Edit Image page. Click on .
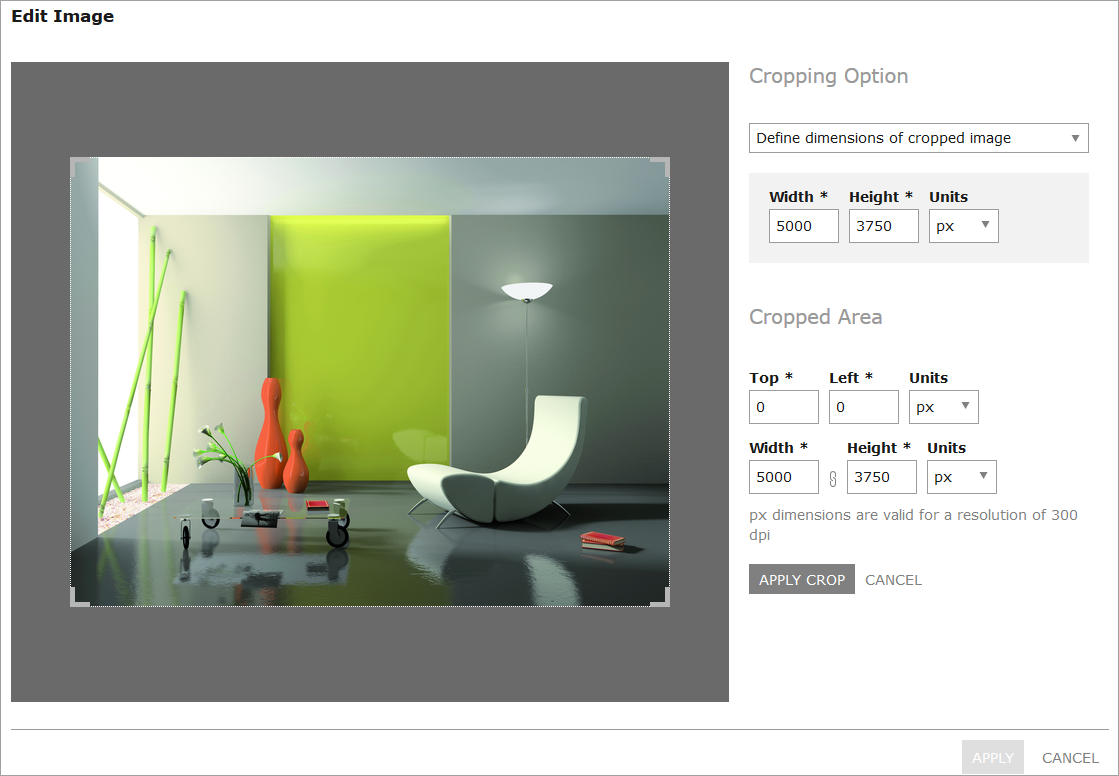
In the next dialog box, select Define dimensions of cropped image in the Cropping Option drop-down list. The Width, Height and Units fields will be displayed. Select the unit cm and enter 16 (cm) for the width and 8 (cm) for the height. The crop rectangle will automatically be set to its maximum size with an aspect ratio of 16:8 = 2:1.
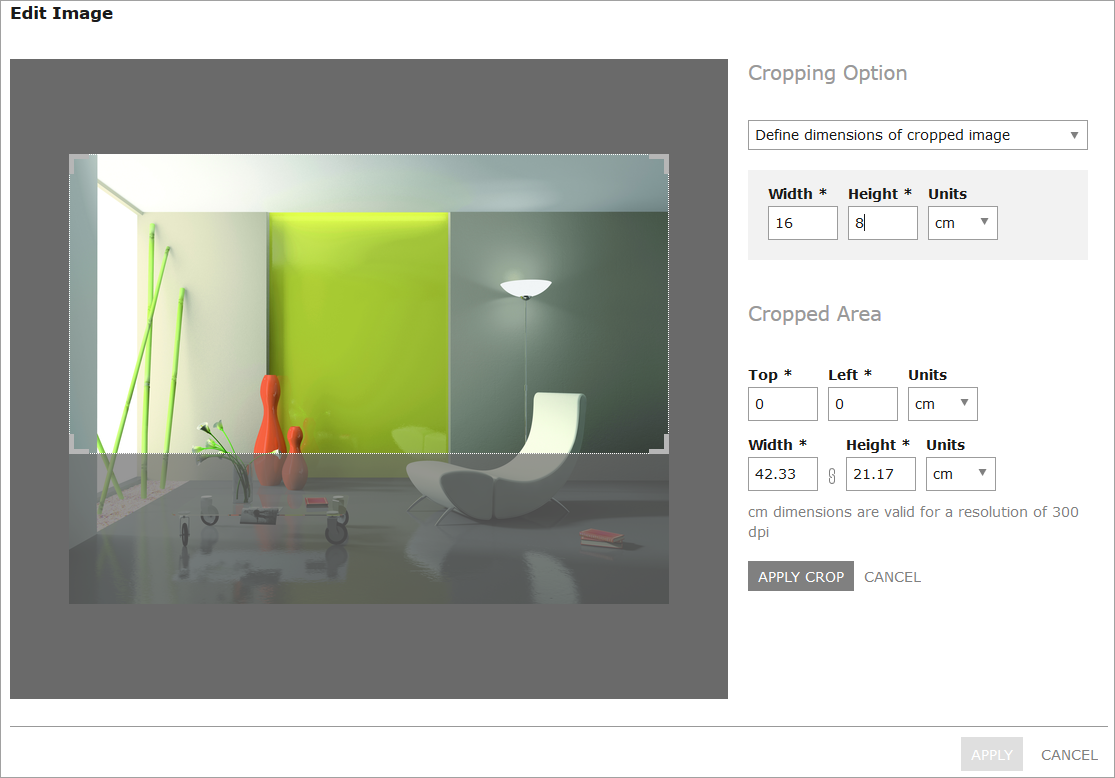
Select the desired section, e.g.:
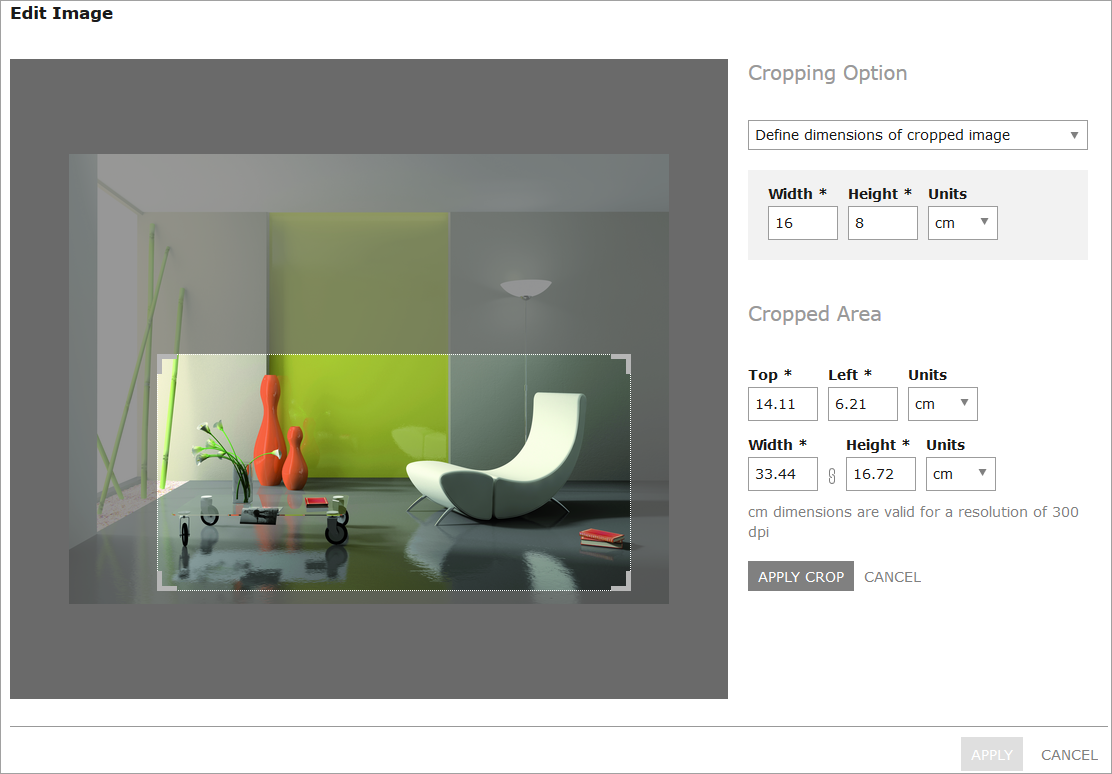
The position of the rectangle (Top and Left) and the original size of the selected area at the resolution of the rendering scheme (Width and Height) will be displayed under Cropped Area. Click to crop the selected area and display it with a size of 16 × 8 cm at a resolution of 300 dpi:

The following transformations ❸are available:
|
Function |
Description |
|---|---|
|
|
Rotate 90° counter-clockwise |
|
|
Rotate 90° clockwise |
|
|
Flip horizontally |
|
|
Flip vertically |


If configured, you can select a background image ❹for transparent images. This can be useful if you want to render an image with a logo in the background.
Select an image from the drop-down list. The images are managed in the Administration. If you have any questions, please contact your system administrator.
You can apply a color effect ❹to the image in the final section. Select whether to display the image in a sepia hue or grayscale, or create a negative.
Please refer to Editing an Image for information about how to access image editing functions. Note that the following instructions are part of the instructions for ⋮ >> (see Save) or Send as e-mail (see E-Mail Delivery.