Texts and Images
In this section, you learn how to edit the texts and images of the document. The template designer chooses which content you can edit and which editing options you can use in the template.
In the document editor, select a page and go to the Content tabIf the page contains editable text or image box content, this will be displayed:
Note
The configuration of the document editor determines whether one or more variables are displayed and whether you have the selection options described below. If you have any questions, contact your system administrator, who sets up appropriate configurations, or the designer, who assigns a configuration to the templates.
To display different variables, you have several options:
-
In the document preview, select a box on the page by clicking its object handle. Its corresponding variables are then displayed. Go through the boxes one after the other.
If no boxes with a frame are displayed, check whether the Show Elements function is activated in the editing bar. If the function is not activated, choose Show Elements. Now, check whether any box is displayed with a frame. If no box with a frame is displayed, there is no box with corresponding variables on this page. Go to the next page. -
If you want to see all variables of a page on the Content tab, select Show all editable contents on current page in the Displayed editable content selection list. All the variables on the page are then listed one below the other. Note that the template designer may have deactivated this function under some circumstances.
-
If you select Group editable content of the current page in the Displayed editable content selection list, a second list is displayed. In this list, the boxes are grouped according to the following scheme:
-
Other editable contents are summarized under the entry General page contents.
With this setting, you can call up each Smart Grid in turn and other content in summary form.
The template designer has chosen how you can edit the variables in the template. The following sections describe the different editing options.
Note
Note that the template designer provides you with useful information about the variable in some circumstances. In this case, the  icon is displayed next to the variable. When you position the cursor on the icon, the information from the template designer is displayed in a tool tip. Alternatively, help texts are displayed at the bottom of the tab.
If you cannot access any help texts, the icon is not displayed and the help text area at the bottom of the tab does not display any text.
The following editing options are available for text variables:
|
Editing option |
Description |
Recognizable by |
|---|---|---|
|
Text entry |
You can write the text yourself. |
You can enter text in the input field. Formatting functions may be displayed above the input field. |
|
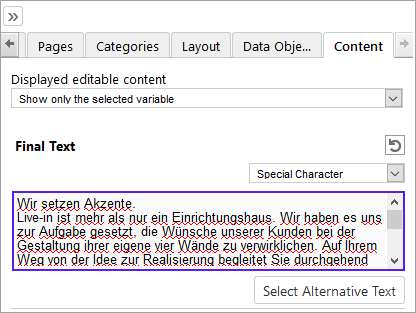
Choice of alternative texts |
The template designer specifies alternative texts from which you can select a text. |
The Select alternative text button is displayed. |
|
Editing a formula result |
The variable content is generated by a formula. This can be the result of a mathematical calculation or the compilation of data from different sources according to certain rules, e.g. an address. |
Below the variable the checkbox Overwrite formula result manually is displayed. If you activate the checkbox, you can edit the variable. |
You can also combine a text entry and the choice of alternative texts. This means that, for example, you select an alternative text, but can still re-edit or even fully replace it.
To edit a text variable, you can also activate an editor in the template. You can then format the text, for example, by making it bold or italic. The options available in the editor depend on the settings in the template. For more information, see Text Editor.
On the Content tab, a date entry may also be required:
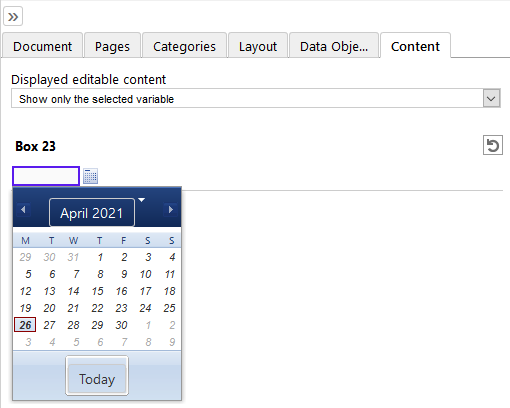
Enter your required date directly in the field or click the calendar icon. A calendar opens where you can select a date.
If a variable consists of a table, you can edit the table in a separate dialog box. The table is listed by name on the Content tab. Click Edit to open the table.
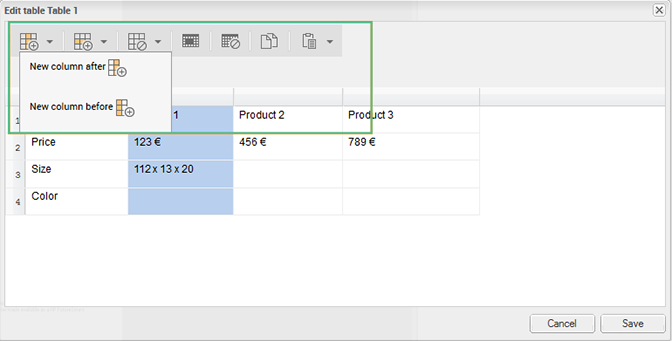
To edit a cell, open it by double-clicking it.
In the top part of the dialog box, you can call up the following functions in order to edit the table.
|
Function |
Description |
|---|---|
|
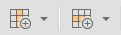
|
Select a column or row and insert a new column or row before or after it. |
|
|
Select a column or row to delete it. |
|
|
Select adjacent cells to merge them or select a cell to be split. |
|
|
Select a column or row to copy to the clipboard. Select a column or row and paste the content of the clipboard before or after it. You can also overwrite a selected column or row. When you insert a copied column or row, the table formatting is inserted as well as the content. |


If the template is configured accordingly, you can edit or format the cell content with an editor. Switch to edit mode by double clicking in a cell. The editor is displayed at the top of the dialog box.
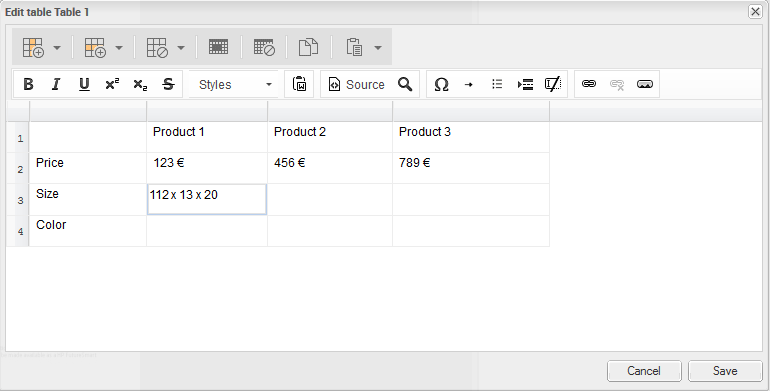
Click Save to save your entries and close the dialog. Click Cancel to discard your entries and close the dialog.
The following editing options are available for image variables:
|
Editing option |
Description |
Recognizable by |
|---|---|---|
|
Choice of different sources |
You can freely select images from various sources:
If you have access to the Media Pool module:
Note: please note that under some circumstances this search returns fewer hits than the direct search in the Media Pool. The reason for this is that a search started from Brand Template Builder has more restrictions (for example, the list includes only assets for which the properties Print quality and Suitable for Brand Template Builder are activated). |
The Add Asset button is displayed. Images from the Media Pool may also be displayed. |
|
Choice of alternative images |
The template designer specifies alternative images from which you can select an image. |
In addition to the original image, at least one alternative image is displayed. |
The choice of different sources and choice of alternative images can also be combined.
The template designer may give you the option of selecting a section of the image. In this case, the  button is displayed on the previews for the images. If you click the button, the Crop Image dialog box opens. For more information, see Selecting an Image Section.
Picklists can also be displayed on the Content tab. The template designer uses picklists to provide you with centrally managed texts and images.
Example
A brochure contains a field in which the address of the affiliate that creates and publishes the brochure is to be printed. The addresses of all the affiliates are managed in the system. The template designer has therefore linked the centrally managed data with the address field.
In the document editor, two picklists are displayed on the Content tab. The lists cascade (that is, the display of the second list is dependent on the selection in the first list). The second picklist is therefore grayed out until you have made a selection in the first list:

In this example, there are multiple affiliates in each city. To ensure that you do not need to select the affiliate in an unclear and long list, first select the city in which the affiliate is located:

Then, choose an affiliate in the selected city in the second picklist:

The address data for the selected affiliate is automatically written to the assigned variables and can also be viewed in the document preview after you refresh it.
Usually, you cannot see the corresponding variables on the Content tab. If you can, the template designer may have allowed you to re-edit the data.
Note the following points:
-
Instead of two picklists, you may see more cascading lists, lists that are independent of each other, or only one list on the Content tab in some circumstances. This depends on your use case.
-
If only the content of a variable is dependent on the picklist, the picklist may be displayed directly next to the variable.
Note
Note that the display of entries in lists may depend on the affiliate IDs that are selected for you. As a result, when you edit documents based on the same template, you may see different entries if you are assigned different affiliate IDs during editing.
Note that a variable for texts in particular is not necessarily equivalent to the boxes in the document:
-
Boxes are highlighted by an orange frame in the document preview and are equivalent to the text and image boxes created in the original InDesign document.
-
Variables represent the part of a box that you can edit. If you can change all the content with the variable, the variable does not represent the box. However, the template designer can also create multiple variables for a text box. In addition, a variable may affect multiple boxes on multiple pages due to its text flow. You edit a text flow for the start box.
Furthermore, you may not be able to identify a relationship between the variables and the changed box content:
Example 1: the content is calculated by a formula.
For this purpose, you enter values in one or more variables (for example, a discount in %). If configured accordingly, Brand Template Builder calculates the content (for example, a discounted price) for one or more boxes or box sections. The calculated prices do not have to be on the same page; instead, they can be created throughout the document.
Example 2: the content is created automatically.
Here, you enter values in no variables, one variable, or several variables (for example, text). Text. An external program is responsible for automatically creating the content and, for example, generates a QR code that is displayed in a box.
If necessary, you can call the Override generated content function from the object handle for an automatically filled box. When you call this function, the current and automatically generated box content is displayed.
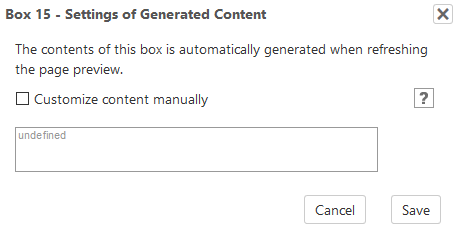
If you activate the Customize content manually checkbox, you can change the automatically generated result.
If you do not understand the relationships, use the icon to see the tool tips that the template designer provides for you. If this information is insufficient, contact the template designer.
Check whether you can change the display of the boxes (see Displaying Boxes in the Document).